As a fun project I thought I’d put Google’s Inception-v3 neural network on a Raspberry Pi to see how well it does at recognizing objects first hand. It turned out to be not only fun to implement, but also the way I’d implemented it ended up making for loads of fun for everyone I showed it to, mostly folks at hackerspaces and such gatherings. And yes, some of it bordering on pornographic — cheeky hackers.
An added bonus many pointed out is that, once installed, no internet access is required. This is state-of-the-art, standalone object recognition with no big brother knowing what you’ve been up to, unlike with that nosey Alexa.
But will it lead to widespread useful AI? If a neural network can recognize every object around it, will that lead to human-like skills? Read on.
How To Do Object Recognition
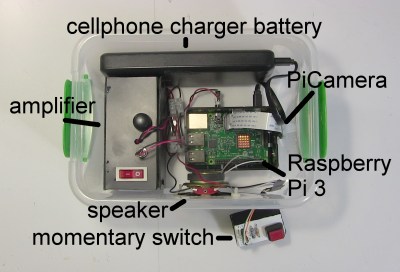
Inception object recognizer internals
The implementation consists of:
- Raspberry Pi 3 Model B
- amplifier and speaker
- PiCamera
- momentary swtich
- cellphone charger battery for the Pi
The heart of the necessary software is Google’s Inception neural network which is implemented using their TensorFlow framework. You can download it by following the TensorFlow tutorial for image recognition. The tutorial doesn’t involve any programing so don’t worry if you don’t know Python or TensorFlow. That is, unless you’re going to modify their sample code as I did.

classify_image.py printing that it saw a panda
The sample code takes a fixed named file containing a picture of a panda and does object recognition on it. It gives the result by printing out that it saw a panda. But that wasn’t enough fun.
I hunted around for some text-to-speech software and found Festival. Now when it wants to say it saw a panda, I modified the sample code to run Festival in a linux shell and tell it to actually say “I saw a panda” to the speaker.
http://ift.tt/2sszWnP
But that still wasn’t fun enough. I connected a PiCamera to the Raspberry Pi, and had that take a photo and give it to the TensorFlow code to do object recognition. In the vernacular, it now ran inference on my photo.
And lastly, to make it all real easy I connected a momemtary switch to one of the Pi’s GPIO pins and took the photo when the momentary switch was pressed.
Here’s the Python program’s main() function before…
def main(_):
  maybe_download_and_extract()
  image = (FLAGS.image_file if FLAGS.image_file else
           os.path.join(FLAGS.model_dir, 'cropped_panda.jpg'))
  run_inference_on_image(image)
… and after.
def main(_):
  os.system("echo %s | festival --tts" % "Wait while I prepare my brain...")

  maybe_download_and_extract()
  # Creates graph from saved GraphDef.
  create_graph()

  # preparing for the switch
  GPIO.setmode(GPIO.BCM)
  GPIO.setup(17, GPIO.IN)

  camera = PiCamera()

  os.system("echo %s | festival --tts" % "I am ready to see things.")

  while True:
    # loop for the switch
    while (GPIO.input(17) == GPIO.LOW):
      time.sleep(0.01)

    # take and write a snapshot to a file
    image = os.path.join(FLAGS.model_dir, 'seeing_eye_image.jpg')
    camera.capture(image)

    os.system("echo %s | festival --tts" % "I am thinking about what you showed me...")
    human_string = run_inference_on_image(image)
    os.system("echo I saw a %s | festival --tts" % human_string)
The calls to os.system() are where I run the Festival text-to-speech program to make it say something to the speaker.
maybe_download_and_extract() is where Google’s Inception neural network would be downloaded from the Internet, if it’s not already present. By default, it downloads it to /tmp/imagenet which is on a RAM disk. The first time it did this, I copied it from /tmp/imagenet to /home/inception on the SD card and now run the program using a command line that includes where to find the Inception network.

Running the inception object recognizer
The call to create_graph() was moved from inside the run_inference_on_image() function. create_graph() sets up the neural network, which you need do only once. Previously the program was a one-shot deal, but now it has an infinite while loop which calls run_inference_on_image() each time through the loop. Obviously, setting up the neural network is something you do only once (see our introduction to TensorFlow for more about graphs) so it had to be moved above the loop.
The run_inference_on_image() function is where the image is given to the neural network to do the object recognition. It used to just print out whatever it thought was in the image, but I modified it to instead return the text string containing what it thinks the object is, “coffee mug” for example. So the last line is where it would say “I saw a coffee mug” to the amplifier and speaker.
Boxing all that up gave me a small, standalone package that could be carried around and tried out by anyone. Here’s a video of it in action.
An improvement would be to add a small screen so that the user could see what the camera sees, but the PiCamera has a wide viewing angle and a screen turns out to be not necessary.
How Good Is Its Object Recognition

Inception seeing a tobacconist
Showing it a cell phone often results in it saying it saw a cell phone, but sometimes an iPod. However, so far it has gotten water bottles and coffee mugs correct every time.
However, it doesn’t do well with people. Pointing it at me in my office causes it to say it saw a “tobacco shop, tobacconist shop, tobacconist”, probably due to the shelves of equipment and parts directly behind me. However, standing against a blank wall it said it saw a sweatshirt, removing that it saw a tee shirt, removing that, it said “bathing trunks, swim trunks”, despite seeing only my bare upper torso and head. (I’ll spare you the photo.)

ImageNet sample cellphone images

ImageNet sample coffee mug images
The neural network is trained on a dataset called ImageNet, the version from the Large Visual Recognition Challenge of 2012. That dataset consists of a huge collection of images divided up into 1000 classes, each class containing images of a particular object. As you can see from this small sample from the cell phone class, some of the phone images are a little dated. However, objects such as coffee mugs don’t change over time.
But that didn’t stop everyone who played with it from having fun, walking around testing it on everything in sight, like finding a magic wand for the first time and waving it around to see what it could conjure.
Is That The Best You Can Do?
Well, first off, each recognition takes around 10 seconds on a Raspberry Pi 3 so either that has to be sped up or a faster processor used, preferably one with a CUDA-enabled Nvidia GPU since that’s the only type of GPU TensorFlow currently supports.
The Inception neural net is only as good as the data it’s trained on. The flaws I pointed out above regarding recognizing cell phones and people are issues with the ImageNet dataset. Only 3.46% of the time are all 5 of its best guesses wrong, whereas humans doing the same test are wrong in their 5 best guesses 5% of the time. Not bad.
As we pointed out in our article about the freaky stuff neural networks do today, Long Short Term Memory (LSTM) neural networks can examine what they see in a single frame of a video, while taking into account what came before in the video. For example, it has more confidence that it saw a beach ball instead of a basket ball if the preceeding scene was that of a beach party. That differs from the Inception neural network in that Inception has only the image you show it to go on.
Where Does This Get Us?
Will improved object recognition lead to widespread useful AI with human-like skills? The evolution of the eye is often cited as a major cause of the explosion in lifeforms known as the Cambrian explosion around 541 million years ago, though there is much debate about that being that cause.
When those eyes evolved, however, there was already some form of brain to use them. That brain already handled the senses of touch, vibration and smell. So improved object recognition alone wouldn’t cause a revolution. For human-like skills our AIs would need more intelligence. We currently have only bits and pieces of ideas of what we need for that.
What many agree on is that our AI would need to make predictions so that it could plan. For that it could have an internal model, or understanding, of the world to use as a basis for those predictions. For the human skill of applying a soldering tip to a wire, an internal model would predict what would happen when the tip made contact and then plan based on that. When the tip contacts the wire, if things don’t go as predicted then the AI would react.
Recent work from Facebook with Generative Adverserial Networks (GANs) may hint at a starting point here that contains such a model and predictive capability (if you’re not familiar with GANs, we again refer you to our article about the freaky stuff neural networks do today). The “generative” part of the name means that they generate images. But more specifically, these are deeply convoluted GANs, meaning that they contain an understanding of what they’ve seen in the images they’ve been trained on. For example, they know about windows, doors and TVs and where they go in rooms.
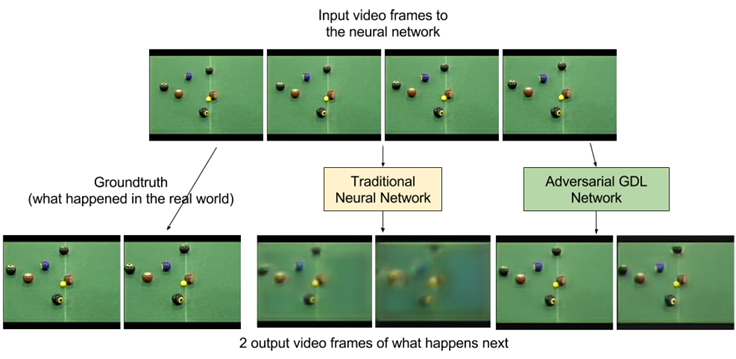
ADGL video predictions
What about making predictions? More work from Facebook involves video generation. Using Adversarial Gradient Difference Loss Predictors (AGDL) they predict what the next two frames of a video should be. In the photo of a billiards game you can see the ground truth, i.e. what really happened, and what the AGDL network predicted. It’s not very far into the future but it’s a start.
Those are at least small steps on the path from a naive object recognizer to one with human-like skills.
In Closing
Where might you have seen the Inception neural network recognizing objects before? We’ve covered [Lukas Biewald] using it on an RC car to recognize objects in his garage/workshop.
While this turned out to be fun for everyone to use as is, what other uses can you think of for it? What useful application can you think of? What can be added? Let us know in the comments below.


 You probably learned in school that you couldn’t see a single atom, and that’s usually true. But [David Nadlinger] from the University of Oxford, trapped a positively charged strontium atom in an ion trap and then irradiated it with a blue-violet laser. The atom absorbs and reemits the light, and a camera can pick up the light, creating a one-of-a-kind photograph. The camera was a Canon 5D Mk II with a 50mm f/1.8 lens — a nice camera, but nothing too exotic.